
The radar screen
What everything on the screen means: the top bar, the radar, flight strips, the instruction panel and the radio log.
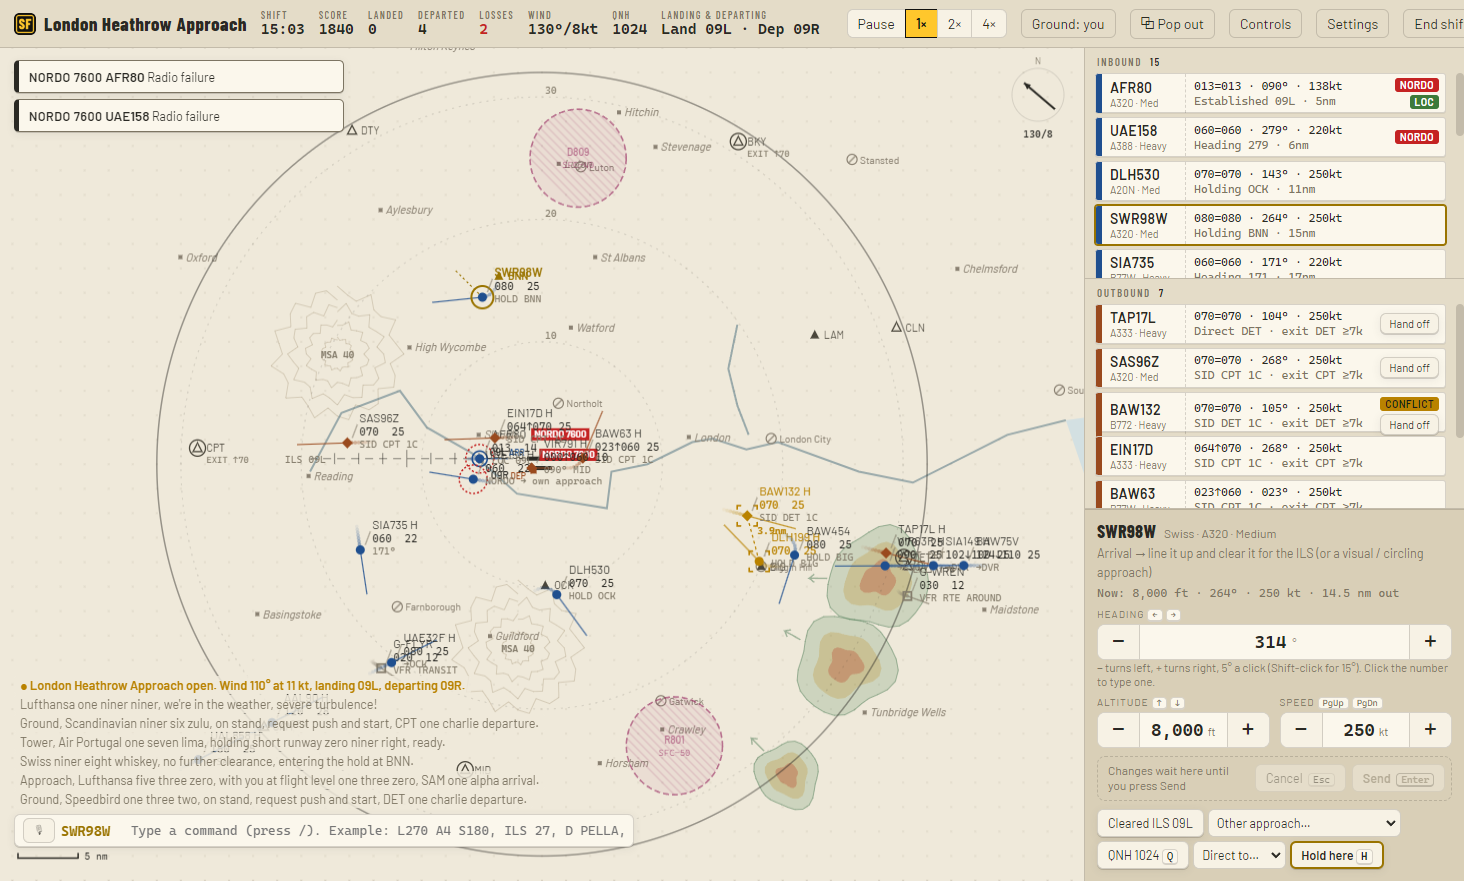
The top bar
- Airport & position
- Where you are and what you're working (for example “London Heathrow Approach · Daily”).
- Shift
- How long you've been on, or how long is left in a timed shift.
- Score
- Your running score. See Scoring & grades.
- Landed / Departed
- Movements so far.
- Losses
- Losses of separation this shift. It turns red after the first one.
- Wind
- Direction and speed, with gusts if any (for example
260°/14G25kt). - QNH
- The local air pressure setting you pass to arrivals.
- Landing & departing
- The runways in use right now. They change when the wind does.
- Pause, 1×, 2×, 4×
- Game speed.
- Ground
- When ground control is on, who's doing it: you, or the AI (press U to swap).
- Pop out
- Opens the flight strips in their own window, handy on a second monitor.
The radar
Aircraft and their labels
Each aircraft is a dot with a short trail of where it's been, and a heading line showing where it'll be in a minute (you can turn these off). Arrivals and departures have different colours. Next to each one is a data block:
- Line 1: callsign, then
Hif it's a heavy (light aircraft show their registration, likeG-OPAL). - Line 2: altitude in hundreds of feet (
080= 8,000 ft), an arrow and the target level if it's climbing or descending, then speed in tens of knots (25= 250 kt). - Line 3: what it's doing: a heading like
230°,→PELLAfor a direct,HOLD PELLA,ILS 27R(cleared, intercepting),LOC 27R(established),VIS/CIRCLEapproaches,SID CPT 1C,MISSED → fix, orNORDO. Departures also show their exit fix.
An aircraft with an emergency has a dashed red ring. A selected aircraft is highlighted, and its strip is too.
Conflict colours
- Amber: a conflict is predicted within the next minute if nothing changes.
- Red: separation is lost right now.
If you use one of the colour-blind palettes, conflicts also get a shape, not just a colour.
The map
- Airspace circle
- The edge of your airspace. Arrivals appear at entry points on it; departures leave through exits on it.
- Range rings
- Faint rings every 10 nm from the field.
- Runways
- Thick lines, labelled with each end's number. Runways in use show
ARRorDEP. - Extended centreline
- The dashed line out from each landing runway: the line arrivals join to land. Ticks every 2 nm, with a longer tick at 10 nm. NEW IN 1.11 (they were every 5 nm before).
- Fixes
- Triangles. Filled triangles are holding fixes (where arrivals hold);
EXITfixes show where departures leave. - MSA labels
MSA 35over high ground means the minimum safe altitude there is 3,500 ft.- Restricted areas
- Hatched red circles, labelled like
R101 SFC–50: no entry from the surface up to 5,000 ft. - Storm cells
- Green, amber and red blobs that drift with the wind.
- Towns, rivers, coast, airfields
- Scenery to help you find your way.
- Wind arrow
- Top right: where the wind is blowing from, and how strong it is.
- Scale bar
- Bottom left: 5 nm.
Scroll to zoom, drag to pan, double-click empty space to reset the view.
Flight strips
On the right, every aircraft has a strip, split into Inbound and Outbound. A strip shows the callsign, type and weight (Heavy, Med or Light), altitude and target, heading, speed, what it's doing and how far out it is. Tags flag what needs attention:
| Tag | Meaning |
|---|---|
CONFLICT | Conflict predicted within a minute |
SEP LOST | Separation lost now |
MAYDAY 6:12, PAN, NORDO | Emergency, with time left where it matters |
TCAS RA | The aircraft is following a collision-avoidance climb or descent |
PULL UP, LOW ALT | Terrain warning, or below the safe altitude |
LOC, VIS | Established on the approach |
TWR | Handed to Tower NEW IN 1.11 |
REQ ↑, REQ ↓, REQ DCT | The pilot has asked for higher, lower or a direct NEW IN 1.11 |
H/O… | Being handed to centre |
AI APPROACH and similar | The AI controller is working it (when you've chosen a single position) |
Some strips have buttons: Accept H/O, Hand off, Take-off, Push & taxi, Approve (VFR), → Tower. Click a strip to select its aircraft.
The instruction panel
Below the strips is the panel for the selected aircraft: its emergency card (if any), a line saying what it needs, and controls for heading, altitude and speed, plus buttons for approaches, direct-to, hold, Tower, expedite and the rest. See Giving instructions.
Radio log and command box
Bottom left is the radio log: your instructions, pilots' replies and system messages. Below it is the command box: press / to type a command, or hold V (or the microphone button) to speak one. The emergency cards for every aircraft in trouble sit at the top left of the radar.